


Cuprins
Now such “traps” are very popular all over the world, you can easily buy them or make them yourself. In our master class, we will tell you how to make a dream catcher with your own hands.
What is a dream catcher for?
North American Indians believed that bad dreams were caused by evil spirits. Therefore, a special amulet was called upon to protect them from them – a “dream catcher” or dream catcher. According to the legends, bad dreams get tangled in the web and disappear with the first rays of the sun, while good ones slip through the hole in the center.
Many tribes have claimed the authorship of dream catchers: the Navajo, Lakota Sioux, Huron, Cree, Mohawk, Cherokee, Iroquois, and Ojibwe. Each of them has their own legends about this amulet. For example, the Ojibwe believed that the Spider Grandmother gave the talisman to the shaman. And according to the legends of the Indians of the Lacotta tribe, the teacher of wisdom in the guise of a spider appeared to the leader and gave him a talisman. The spider wove a web, and in the middle left a hole through which only good dreams could slip through.
The Indians used materials such as wicker, thread, deer veins, shells, wooden or bone beads, feathers of birds of prey (owl for women and eagle for men) for its manufacture.
All materials had their own meaning: a willow hoop denoted the circle of life, a web of deer veins – the right paths of life, and feathers were a symbol of air, breathing, as well as the path that a person should follow in a dream.
Dreamcatchers became popular in the 1960s and 1970s. They spread far beyond the borders of Indian culture. They have been very popular in recent decades in Our Country.
By the way, some Siberian peoples also had a similar amulet. It was called Kytgy, which is translated from Koryak as “bait”. It was used by shamans in their work. Unlike the Indian catcher, he did not protect against bad dreams, but helped control dreams and overcome evil spirits in them. Weaving is also different in kytgyem. It represents 36 rays that depart from the center and cross their thread-spiral.
How to make a dream catcher: step by step instructions
Traditionally, only natural materials were used to make dream catchers. However, a modern urban dweller does not always have such an opportunity. For the base, we need willow branches. But if necessary, they can be replaced with improvised materials, for example, a hoop will become a convenient option for a round base.
Deci, avem nevoie de:
- The basis of our catcher: willow branches or the inner part of the hoop of different diameters.
- Threads. Floss or iris will do. You can use different colors.
- Beads. Wooden, glass and even plastic ones will help decorate your catcher.
- Feathers. This is an integral part of the amulet.
- Foarfece.
- Glue. Helps to secure the threads.
- Needle. Traditionally, dream catchers do without it, but if you want to make the job easier, you can use it.
- Tapes. Satin ribbons can also be useful for braiding the base and decorating the catcher.
1. Pregătiți baza
If you have willow branches at your disposal, you are in luck – this is the best material for the base. Gently bend the branch into a circle and braid the tip around the other. Then the base must be dried for a couple of days before continuing to make a trap. It is not necessary to braid such a base; a natural branch looks very beautiful. You can decorate it with ribbon if you like.
You can look for wooden bases in an art supply store or cut a ring out of thick cardboard. It is better to wrap it tightly with threads or ribbons.
In our case, the basis for the dream catcher will be the hoop, or rather, their inner part. We take a thread, tie a loop at the end, for which we will hang our amulet, and then tightly wrap the base with them so as to completely hide it. Each new turn should fit snugly against the previous one. We fix the end of the thread with a knot and cut off the excess.
The hoop is a smooth material, which means we can use another method. For him, we need a long, double-folded thread. On the side of the fold we make a loop for hanging. Starting from the other end, we wind the thread into a ball for convenience. We fix it on the hoop: we put the thread on top, draw it under the hoop and bring it out in the center between two threads, getting a knot.
Then we put it on the base, forming a semicircle, we draw the ball under the base and bring it out under the thread, getting a knot. The nodules tighten tightly and move closer to each other. We stretch the thread into the last loop several times and thus fix it.
2. Weave a “web”
Can be pre-marked based on where the thread is attached. In order to determine how far to fasten the thread, it is recommended to divide the length of the warp by the number of such attachment points and a half. For example, in our case, we divide 63 cm by 8,5.
Tie a thread on the hoop. Then stretch it to the desired distance, circle around the warp and pull it out through the ring to the left of the thread. Do this on the entire circumference at about the same distance from each other. The first row of the “web” is ready.
In the same way we do the next, but now we attach the thread to the first row.
Also, by weaving how many rows in one color, you can fasten the thread with a knot and continue to weave further with a new thread of a different shade. Having reached the center, we complete the weaving and tightly tie the thread with a knot.
If you want to decorate the “web” with beads, string them on a thread before you start weaving. For convenience, you can use a needle with a wide eye. Then you don’t need to string the beads in advance, add them as you weave.
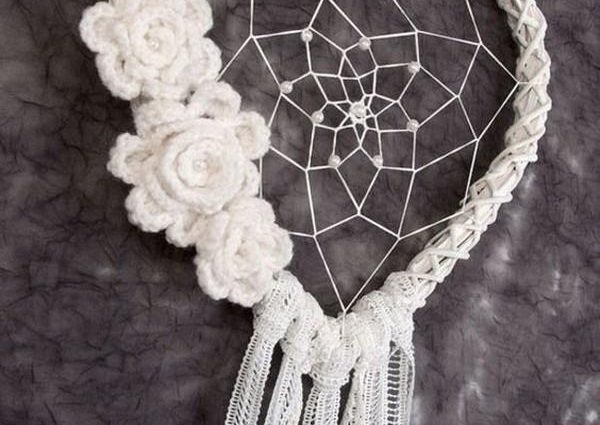
3. Decorate the dream catcher
The decoration of the amulet does not end with the beads that we wove as we worked on the “spider line”. Attach a thread on the sides of the catcher and a few below, add beads, beads on them and attach feathers. To prevent the beads from rolling down, fix them with small knots or glue.
We made a simple version of the dream catcher. You can weave two or three of these catchers of different diameters and connect them together.
How to use the dream catcher
So, our dream catcher is ready. Choose a suitable place for him in the house. Traditionally, the catcher was hung over the head of the sleeper. Attach it above your bed to guard your dreams. You can also hang it on the ledge by the window, on the chandelier or just on any wall. It is desirable that direct sunlight falls on the catcher, because it is they who clean the amulet.
Light dreams!